Showing posts with label Beacon Adhesives. Show all posts

Saturday, December 21, 2013

Bloom Girls Workshop 2


COST $35.00 

IF YOU SIGN UP PRIOR TO JAN. 1ST YOU WILL ALSO RECEIVE WATERCOLORS 101 FOR FREE!!! IF YOU'VE ALREADY TAKEN WATERCOLORS 101 YOU WILL RECEIVE WATERCOLORS 102 IN MARCH. 


TO SIGN UP CLICK -------> HERE


You will engage in a video workshop that will take you through every step from start to finish on how to create your very own Bloom Girl art.
​
This course includes 3 recorded videos. You will have unlimited access to the recordings, that way you can work at your own pace! 
  You will receive an invite to join a Facebook group to talk, ask questions, and share your progress. All of the templates and guides you may need will also be provided, so there is no need to have a drawing background.

Supplies you will need to finish your project:

  • 12x12 canvas or larger. (your preference) 
  • Gesso white and black
  • Acrylic paints in a variety of colors (ones you'd like to use for the background. You will need at least one nutruel color ie. white or bisque) I suggest a paint like liquitex basics but any standard medium based acrylic will work
  • India Ink
  • Embellishments (flowers, gems, metal, ect.)
  • PanPastels or chalks to help accent and shade your Bloom Girl. Black, grays 
  • Masks/stencils
  • White paint pen
  • Paint brushes 
  • Makeup sponges
  • pallet knife or old gift card
  • Gold leaf and fast finish decoupage (optional) 

Wednesday, January 2, 2013

New Online Workshop!!

Hi everyone, It's a new year full of new possibilities. I have my first online workshop for the year and would love to have you join me. It is a five week course where you will learn everything you will need to know to create your very own Bloom Girl. All of the information you will need to register can be found here. You will engage in five live ustream classes and have access to the recordings for an entire year that way you can work at your own pace! You will receive an invite to join a Facebook group to talk, ask questions, and share your progress; all of the templates and guides you may need will also be provided, so there is no need to know how to draw coming into this class. You will also receive a $15 voucher towards an embellishment pack from my Etsy store.(available Feb.1st) You will have all of the information needed to create your own unique work of art.

We will be using supplies by Prima Marketing, PanPastel, Ranger Ink/Tim Holtz, Golden Acrylics, Prismacolor Watercolors.


Here is a little incentive. If you register and share the badge below on your blog and or your facebook page with the registration link you will be entered into a drawing to receive a refund on your class!!!


Happy creating and I wish you a very creative and inspiring new year. 


Hugs
Jamie D.

Wednesday, May 18, 2011

Vintage Street Market

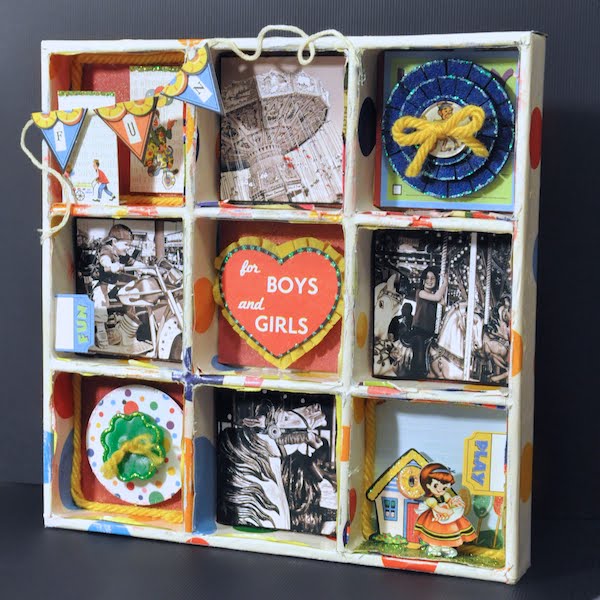
I posted my first project for Vintage Street Market, and can I just say that now, that I got to use the kits I am in LOVE with them even more!!! I made this shadow box, using the Party Games kit. Using the paper to cover the Maya Road Trinkets Box, was so easy. and the thick paper covered well while being easy to work with. I used Beacon's Fast Finish decoupage to cover the box.


I used black and white photos, so that colored photos wouldn't become lost in all of the rich color of the Party Games kit. This kit comes with a 2'x3' piece of crepe paper!!! I know right!?! I used some of it to trim the diecut heart in the center. The crepe paper can be sprayed and altered as well!

Adding a bold piece to the box, I used an Epiphany Felt flower with a PP backed button as the center. I added a touch of diamond stickles to the edges to add some shimmer.

I couldn't help but use this little girl :) She is just so darn cute.


Make sure to check out the blog and Vintage Street Market's Facebook page this week for a chance to win some prizes!!

Wednesday, March 2, 2011

"Spring" Configuration Box

I am so over winter! I needed a little pick me up so I decided to decorate a Tim Holz Configurations box. I had flowers on the brain. I love planting annuals and seeing all of the color in the yard. So I filled every open space with a little Prima goodness :)


The box was altered with book pages and Beacon Fast Finish Decopage. I love that is a liquid instead of a paste. It goes on with less mess and dries quicker. Once it was all dry I inked it with Tim Holtz Distress inks.

The tree is made out of Polymer Clay. I baked it in the oven and then painted it with Golden liquid acrylic paints The leaves are made out of heavy matte Gel and paint and the grass is made with Coarse Pumice gel and paint. The Pumice gel has an awesome gritty texture to it. It's one of my favorite textured gels. I stole a tire off one of Quentin's toy cars. Believe me he will NOT miss it. The kid has enough cars to choke a horse. A little copper wire and it made the perfect swing. :) Living in the country we always had a tree swing. And many bruised bums from trying to do crazy tricks on them lol

My little frog prince needed a pond , and it reminded me of the water and river season. I used Gallery Glass to create the water. It's a glass paint you can find in any Michaels. It's used for fake stain glass. I painted the backgrounds of most of the boxes with Bienfang Watercolor pens. They are so easy and conviniant

I used Martha Stewart Micro beads to fill my little seed bottle.

I seldom do this but I love the smell of sheets that have been hung out to dry. It's a sign that spring and nice weather are here. I made the backdrop out of blue Micro beads and Liquid pearls. There is also a little Maya Road tree in the background.

Spring and summer also means I get to leave the door open and let the breeze and fresh air in. The screen door is my friend. I made the door out of Prima packaging and some fiber screen.

And there wouldn't be spring without all of the song birds out. I have a large feeder right in front of our window. Love to watch all of the finches and sparrows come and eat.

I added a Tim Holtz watch face to signify time and made the banner out of wood paper and colored them with watercolors. I adhered them with Beacon Fabri-Tac.


I made my little flower garden out of Maya Road pins and Prima Flowers. I bent the pin heads and glued the flowers on. The soil is Tim Holtz Distress Stickles.


Thank you for stopping by my blog and I hope this brightens your day as much as it has mine.

Hugs

Jamie

Thursday, February 24, 2011

Graphic 45 Design Team Call

I decided to give it a go :) Here is one of my projects I created for the call. All of my designs have their own page at the top of my blog.

I used an old Readers Digest Garden book to create this altered book
I Used the Once upon a Springtime paper line to decorate it. I embellished it with Prima Flowers as well.


I altered the inside of the book with Watercolor Pens and Tattered Angels Glimmer Mist. The trees greenery was created with Pumice Medium by Golden and sprayed with Chalkboard Mist.

I decided to create this little fairy's wings with Cellophane and Gallery Glass Paint.


My Secret Little Garden. I hope you enjoy it. Thank You for stopping by :)

Hugs
Jamie