Showing posts with label Polymer Clay. Show all posts

Sunday, November 3, 2013

Handmade Holidays Blog Hop Day 3!!!!


Welcome to the Third Annual Handmade Holidays blog hop!! The best crafters, designers, and makers have come together to create and share  a series of thoughtful, handmade gifts for the holidays during this 3 day blog hop. Our goal is to inspire you to create something from the heart this holiday season as well as share how to use our products in fun, innovative ways. We intend this hop to serve as a resource to you for this holiday season and for years to come.

Hop along to each blog in the list. Each day, from November 1 through November 3, 2013, we’ll be posting a brand new list of blogs to hop to. Comment on each blog, share your favorite posts over social media, and then use the Rafflecopter widget at the bottom of each post to enter to win the Grand Prize, a gift basket filled with crafty swag from the companies on the hop! We’re ready to inspire, share, and create – are you ready to hop?


Today I have a fun creative project for all of you. Nothing says more heart felt than homemade. This necklace would be a wonderful gift for that special someone this Christmas or that perfect finishing touch for those holiday parties!


 To create this piece you will need, polymer clay, ICE Resin, Jewelry pieces(Industrial Chic), Smooch in (Olive Twist), Color Box in (Fawn), Pliers, paint brush. 


First use the polymer clay and fill your bezel with the clay. Then you will use a rubber stamp to make a design in the clay. Once you have your design put it in the oven and bake until finished (look at guidelines on the box, products and bake times may vary.)

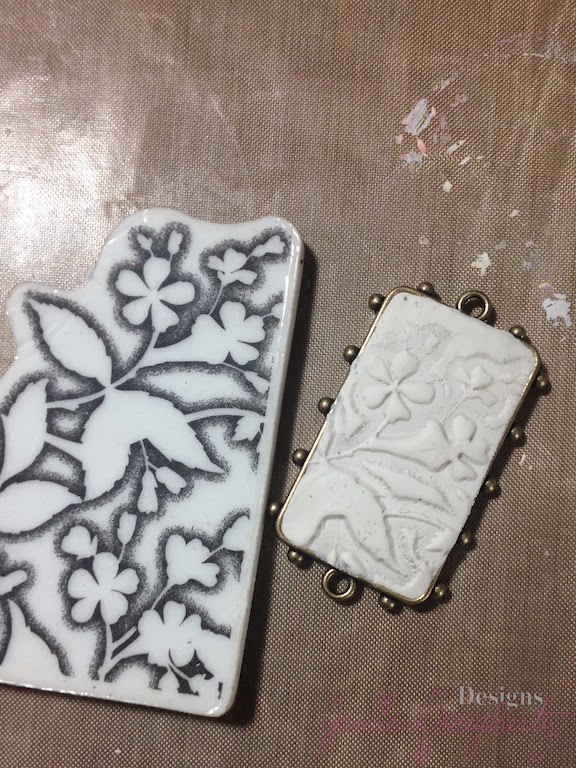
Once your piece is cooled you can now color it. First use your ColorBox ink and run it over the surface of the clay. You can then use the smooch, with its fine point brush and paint in the crevasses to add more dimension to the clay.  


To protect your surface add ICE Resin with a brush. It's self-leveling so you won't have to be too precise when painting it on. You just don't want to add too much. (To mix your resin use the plunger and add your 1 to 1 mixture and stir to make sure the two parts are blended evenly.)


Now you can add your chain and other embellishments to finish the necklace. You can use so many different colors and materials to create this look!! Now go and get your creativity going and make your Holidays handmade ones. 


I have a mixed media prize pack up for grabs!! Leave a comment and you will be entered for the pack valued at over $50.00!!!! 

a Rafflecopter giveaway


November 3:
Sizzix – Eileen Hull Designs http://eileenhull.blogspot.com/
Nathalie Kalbach www.nathaliesstudio.com
Tanner Bell   http://www.craftteen.com
Jennifer Priest http://hydrangeahippo.com
Vicki O'Dell http://vickiodell.com/

Monday, May 16, 2011

Slacking off :)

So I had so many tasks to take care of these past couple of weeks, that my blog got neglected. So did the house work, my car....well you get the idea. Finally I have finished everything (for now) and I am getting back to the real world. The only thing I did not neglect were my kiddos. They are the only thing I will never go a day without spending time with. But back to business.
I had a night last week where I felt a little burnt out, exhausted, testy so i decided to create something on my terms. I love sculpting as you know and I felt I needed a little help with the house work so I created her...

.

I love how she ended up turning out, so I have two other "Real Mousewife" pieces I'm going to create. Just a touch of fun and whimsy in the midst of chaos and deadlines. :)


I had a request to video my next sculpture, so that she could see how i go about making my Polymer pieces. So I hope to get that done soon.


i hope she brings a smile to your face, and remember not to work too hard this week. Now I must attempt to put my house working skills to use :)

Hugs
Jamie

Friday, April 22, 2011

Happy Easter

"I am the resurrection and the life. He who believes in Me, though he may die, he shall live. And whoever lives and believes in Me shall never die."
-- John 11:25-26

The time of spring, new life and new beginnings.


Here is a little project I made to celebrate the holiday. I found the egg at Michaels. It's like those pumpkins you can get there and carve. It was a not so attractive blue :P So I spray painted it and added the Prima lace. The inside of the top also has lace lining it.


Inside there is a special little surprise. A bunny holding a new born chick. I made these little guys out of polymer clay and painted them with acrylic paints. All of the flowers are Prima. The large flowers were white and I altered them first with Cadillac Pink Glimmer Mist then hand painted Apple Glimmer Mist on the tips. I wanted them to match the cherry blossom flowers.


The little eggs are also made from Polymer clay and painted with Chalkboard Glimmer Mists. I wanted them to still have a translucent look to them.

I stained the wood base with a Red Oak stain. (Hint if your finish is too dark and you want to take out some of the stain. Heat it with your heat gun. On unfinished wood the stain will seep back out of the wood and you can quickly wipe it off.)


Here is a close up of the two new friends. Don't those Prima Aire flowers work perfect in their little world.


The grass they are sitting on is actually Donna Downey Prima flower trim. I altered it with (Sprout) Chalkboard mist.


I wish everyone a happy and safe Easter weekend. God Bless

Jamie

Wednesday, March 2, 2011

"Spring" Configuration Box

I am so over winter! I needed a little pick me up so I decided to decorate a Tim Holz Configurations box. I had flowers on the brain. I love planting annuals and seeing all of the color in the yard. So I filled every open space with a little Prima goodness :)


The box was altered with book pages and Beacon Fast Finish Decopage. I love that is a liquid instead of a paste. It goes on with less mess and dries quicker. Once it was all dry I inked it with Tim Holtz Distress inks.

The tree is made out of Polymer Clay. I baked it in the oven and then painted it with Golden liquid acrylic paints The leaves are made out of heavy matte Gel and paint and the grass is made with Coarse Pumice gel and paint. The Pumice gel has an awesome gritty texture to it. It's one of my favorite textured gels. I stole a tire off one of Quentin's toy cars. Believe me he will NOT miss it. The kid has enough cars to choke a horse. A little copper wire and it made the perfect swing. :) Living in the country we always had a tree swing. And many bruised bums from trying to do crazy tricks on them lol

My little frog prince needed a pond , and it reminded me of the water and river season. I used Gallery Glass to create the water. It's a glass paint you can find in any Michaels. It's used for fake stain glass. I painted the backgrounds of most of the boxes with Bienfang Watercolor pens. They are so easy and conviniant

I used Martha Stewart Micro beads to fill my little seed bottle.

I seldom do this but I love the smell of sheets that have been hung out to dry. It's a sign that spring and nice weather are here. I made the backdrop out of blue Micro beads and Liquid pearls. There is also a little Maya Road tree in the background.

Spring and summer also means I get to leave the door open and let the breeze and fresh air in. The screen door is my friend. I made the door out of Prima packaging and some fiber screen.

And there wouldn't be spring without all of the song birds out. I have a large feeder right in front of our window. Love to watch all of the finches and sparrows come and eat.

I added a Tim Holtz watch face to signify time and made the banner out of wood paper and colored them with watercolors. I adhered them with Beacon Fabri-Tac.


I made my little flower garden out of Maya Road pins and Prima Flowers. I bent the pin heads and glued the flowers on. The soil is Tim Holtz Distress Stickles.


Thank you for stopping by my blog and I hope this brightens your day as much as it has mine.

Hugs

Jamie

Thursday, February 10, 2011

Polymer Clay OOAK Doll

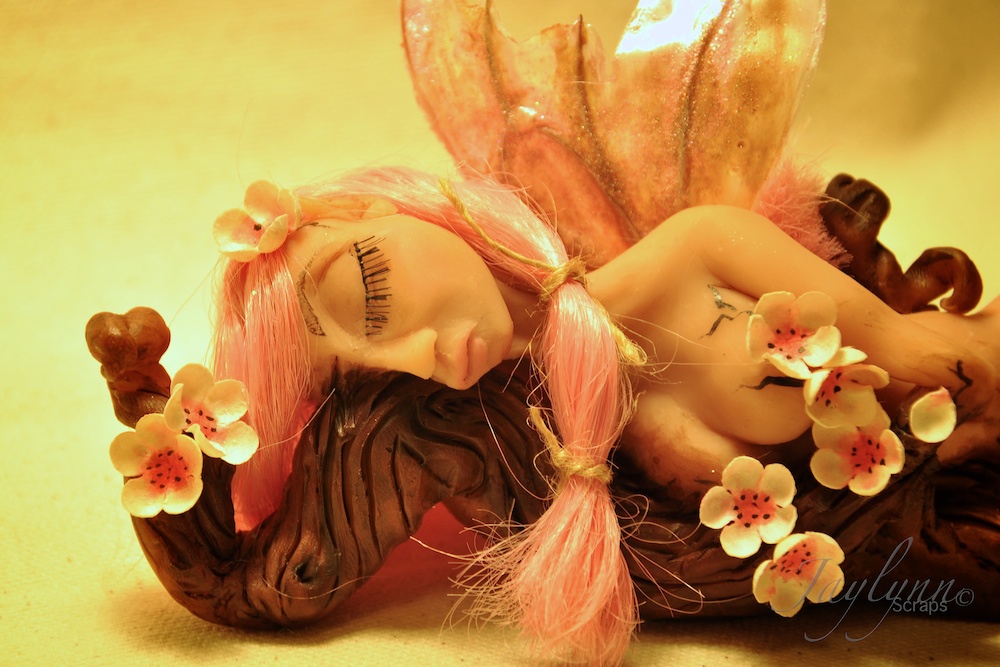
I have done pottery and sculpting but never attempted anything with Polymer Clay before, and nothing at this small of scale. It is far from expert but here is my first attempt at an OOAK doll. This takes a lot of finesse.
Supplies Used:
Clay- Super Sculpey
Clay tools
Flowers-Prima
Paint- Golden Liquid Acrylic, Tattered Angels Glimmer Mist
Hair- Generously donated from one of Karlie's Barbies ;)
Adhesives-Beacon Fabri-Tac
Wings-Check out this link to a woman who shows you how to create your own wings.

This is what my sculpture looked like right before I baked it.

And this is the finished result.

Her lashes came loose in the pic sorry. I hate when that happens lol.

Truth behind idea of the fusion between the fairy and tree came from me unable to get her hands and feet right soooo it merged into this.

The flowers were white Prima flowers that I altered with Glimmer Mist and paint. I first sprayed the flowers with Bronze then painted the centers with Rum Punch.

Her head of hair was created with Barbie hair, I know it's not all fancy but it's what I had and the pink stood out to me. Luckily Karlie had no qualms about giving me the barbie. Anything for art. I cut it from the barbie and adhered it by layers to the polymer clay.

I need to work more on my proportions and those damn eyes. Also those darn things called arms and legs. Practice makes near perfect lol. Not sure if this will become a regular thing but it was a fun detour to the usual :)

Thank You for stopping by. Happy Friday all!!!

Hugs
Jamie