Showing posts with label Scrapbook Adhesives. Show all posts

Tuesday, March 24, 2015

Mother Tag by Lisa

Hi everyone! It's Lisa on the blog today and I have a tag to share with you featuring Jamie's Mother Bloom Girl and a few of her new stencils, too. This stamp is so beautiful and so detailed. It's just stunning. I loved working with it and putting my own spin on it.

(I really wanted to catch the coloring on her face for my main shot. I think she looks so beautiful and almost sad. But I love it.)

Here is what I did to create her:

1 - 2. Stamp image twice onto watercolor paper using archival ink. (Second stamped image can only be of the floral portion of her head.)

3. Using watercolor pencils (or other medium of choice) color in the image.

4. Fussy cut the floral portion of the second stamped image and water color as well.

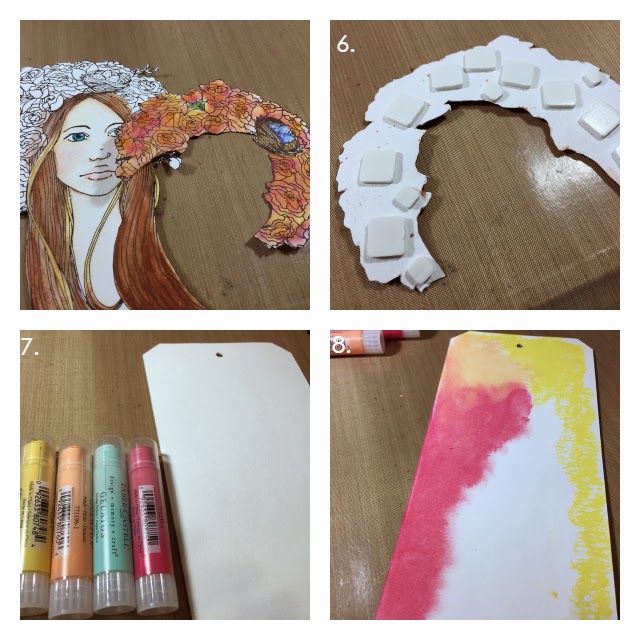
6. Apply foam adhesive on the back of the floral piece.

7. - 8. Using #10 Tag (4 1/8 " x 8 1/2")  and  Gelatos® in the following colors: Watermelon, Buttercream, Peach, and Acqua Dolce create background. Blend colors into each other using fingers or lightly damp rag.
9.Apply Crackle Paste in clear over the left side of the tag and let dry.

10. Stamp sentiment (which is included with the Mother Bloom Girl) in a black pigment ink, emboss with clear embossing powder, cut apart. Apply small foam adhesive to the back. Set aside.

11.  Using Jamie's Circle Stencils (medium) and Gold Texture Luxe™ paste create sun beam in upper right hand corner of tag.

12. Using the same paste dab over the crackled portion of the tag.

13.Apply Jamie's Criss Cross stencil to the right side of tag and using a white pigment pen, create random dots.

14. Go around edges of tag using Salty Ocean Distress Ink.

15. Apply more foam squares to the back of the entire cut out image. and apply to the tag front. Also apply sentiment at this time.

16. Highlight hair, eyes, and flowers with Wink of Stella, if desired.

Here's a little close-up!


You can see all the sparkle and shine...and the layers, too.

and here's another look at the whole tag:


Thanks so much for joining me today and thanks for your patience while I got my post uploaded today, ♥

Here are the Prims supplies I used:
Prima Bloom Girl Stamp (Jamie Dougherty Designs):  Mother– 980283
Prima Stencils:  Criss Cross – 980412,  Circles – 980429
Art Basics Crackle Paste, Clear – 961541


Sunday, June 19, 2011

Summer Fun with Scrapbook Adhesives and Vintage Street Market


Over on the http://www.scrapbook-adhesives.com/blog today, I have a post up using Vintage Street Market's Dimestore Vogue Paper line and Scrapbook Adhesives by 3L™.

Here is a little giveaway I am doing and if you would like to leave a comment here OR on The Crafty Power Blog, you could have a chance to win some of these amazing Adhesive products :)


Thank You for stopping by today. HAPPY FATHER"S DAY and hope you have a wonderful Sunday :)

Wednesday, June 1, 2011

A Few Projects to Share and A WINNER!!

First of the ADHESIVES WINNER for some Scrapbook Adhesives by 3L is Chris Aiton!!!!! Chris email me you mailing info and I will send out your goodies :)

Wow it's been a while. So this might be a big one LOL. I got some happy news to share. My most favorite project was featured in Scrapbook Trends, For The Home idea book. :) I was so honored when they asked to use my project. and it turned out amazing!


I have been working on A LOT of projects these last few weeks. I wanted to share a few here. This one makes me happy :) The bright colors and softness, want me to have another wedding ;) Don't tell my husband that. Maybe just renew our vows? Yeah he would still flip. But at least I got to create pretties non the less. I used Prima Paper flowers and altered them with glimmer mist. Alaskan Salmon chalkboard mist and Turquoise Blue Glimmer Mist go so well together. :) It just might be my favorite color combo for Spring.


I used Vintage Trim and altered it with the Turquoise Blue Glimmer Mist to match it with the bouquet. The small teal flowers I found at Michaels, I sprayed those as well. Why not custom match your colors to everything. Create floral pieces you can cherish for a life time.

He he I couldn't help myself, I always wanted the ring in the bouquet pic so I did one myself.


This next piece was a fave with my friend Desi(Model) that I am going to make her one to match her own wedding coming up in July :) Isn't she going to make a beautiful bride!


Here are a couple of projects I created for Vintage Street Market! I love their Vintage kits and their paper lines. You MUST check them out!!

A couple country themed projects fir the Farmer's Market Kit perfectly. Living in a somewhat small town is one of the greatest blessings I could ask for. Having our kids grow up in a community still tied to roots and tradition is amazing.


Well there ya Go!!! Just a couple projects and I will try and post a few more this week.
Have a great rest of the week and get creative :)

Jamie

Thursday, May 19, 2011

Scrapbook Adhesives by 3L Giveaway!

Good Morning :) I wanted to share with you a LO I made for Scrapbook Adhesives by 3L today and give you a chance to win some adhesive goodies :) Just leave a comment here or on The Crafty Power Blog for a chance to win!!


I love being a mom, who wouldn't with these two littles :) They make it all worth wild. I love them so much!!


Hugs to you all and happy crafting :)
Jamie

Wednesday, May 18, 2011

Vintage Street Market

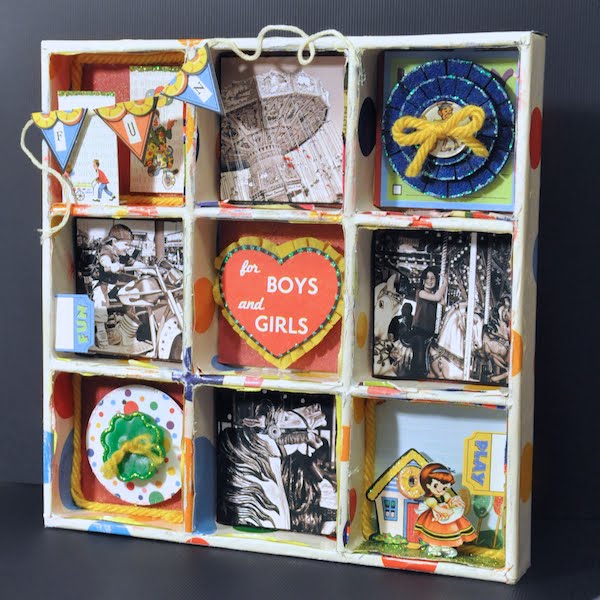
I posted my first project for Vintage Street Market, and can I just say that now, that I got to use the kits I am in LOVE with them even more!!! I made this shadow box, using the Party Games kit. Using the paper to cover the Maya Road Trinkets Box, was so easy. and the thick paper covered well while being easy to work with. I used Beacon's Fast Finish decoupage to cover the box.


I used black and white photos, so that colored photos wouldn't become lost in all of the rich color of the Party Games kit. This kit comes with a 2'x3' piece of crepe paper!!! I know right!?! I used some of it to trim the diecut heart in the center. The crepe paper can be sprayed and altered as well!

Adding a bold piece to the box, I used an Epiphany Felt flower with a PP backed button as the center. I added a touch of diamond stickles to the edges to add some shimmer.

I couldn't help but use this little girl :) She is just so darn cute.


Make sure to check out the blog and Vintage Street Market's Facebook page this week for a chance to win some prizes!!

Wednesday, April 20, 2011

Scrapbook Adhesives by 3L Winners!!!

Hi everyone, a quick post! I wanted to thank everyone who follows and comments on my blog. It truly does mean a great deal to me!! As I had mentioned in my 3L blog post that I would be giving away some awesome adhesive :) So I decided to choose TWO winners. My lovely DD Karlie helped me pick. so if:

Julie Tucker-Wolek

and

Amy Kingsford

Could email me with your addresses I will get your goodies out to you!


Hugs
Jamie

Tuesday, April 5, 2011

Scrapbook Adhesives!!! Giveaway !!!

Good morning all :) I have my first official post up at Scrapbook Adhesives today! I am so excited and along with my post. I have a giveaway for you. Check out Scrapbook Adhesives today and see how I utilized these products and leave a comment for a chance at winning.....


...These Great products!


Hope you have a wonderful day!

Jamie

Friday, April 1, 2011

Exciting News and Quite an honor!


I am extremely excited to announce that i will be a part of the Scrapbook Adhesives Design team. Along with these amazing and and inspiring women.....

Beth Pingry
Celine Navarro
Birgit Koopsen
Nathalie Kalbach
Leica Forrest
Kristen Cohen
Vicki Chrisman
Liz Hicks
Ashley Harris
Courtney Walsh
Tracie Hudson
Candy Rosenberg

Again I am so thankful for being given this opportunity to work along side such supportive and talented artists.


Happy Weekend.

Thursday, February 24, 2011

Graphic 45 Design Team Call

I decided to give it a go :) Here is one of my projects I created for the call. All of my designs have their own page at the top of my blog.

I used an old Readers Digest Garden book to create this altered book
I Used the Once upon a Springtime paper line to decorate it. I embellished it with Prima Flowers as well.


I altered the inside of the book with Watercolor Pens and Tattered Angels Glimmer Mist. The trees greenery was created with Pumice Medium by Golden and sprayed with Chalkboard Mist.

I decided to create this little fairy's wings with Cellophane and Gallery Glass Paint.


My Secret Little Garden. I hope you enjoy it. Thank You for stopping by :)

Hugs
Jamie