Showing posts with label Art Basics. Show all posts

Thursday, May 21, 2015

Wall Clock with Milagros

Hi Bloom fans Milagros here with you! It is always an exciting week when we get to showcase the awesome Bloom Girls products in several forums at the same time.  Have you visited the Prima blog this week? The girls are showcasing the 6x12 stencils, awesome stuff I tell you! You can also find a wall clock I created on their Instagram feed @primamarketinginc or @milagroscrivera !


But since you are here let me break it down for you!
Paint a wood blank wood round in white.  I am using a 14" Walnut Hollow blank
After the paint dries give it a coat of clear gesso the width of the stencil.
Once the gesso dries you are ready to have fun with the Prima watercolor pencils
 who doesn't love a rainbow? My daughter organizes my cardstock in that order, my paint, everything! And she is the inspiration behind this piece, a fun and bright home décor piece!


Now take a look at a sophisticated version done by my 12 year old student Camila.  She was inspired by a LO I had done back in January .  Here I am thinking bright fun colors for my students and here they are producing adult versions, LOL!!! Enjoy, she used Bloom Sprays and the mask with 3D Gloos gel to resist the design!


Enjoy your piece and remember to have fun!
 
Milagros
 
Supplies needed
 
Bloom Ricket stencil
Clear Gesso
White Paint
Prima Watercolor Pencils
Prima Watercolor brush

Tuesday, April 21, 2015

Unmasking Catrina with Milagros

Hi Bloom Fans, Milagros here as your host today!
There's still a few more months for the day of the death so I decided to reveal the beauty of the lady behind the mask.  The roses in her hair are divine.  I recall when seeing her for the first time noticing she was wearing a headdress we know as "mantilla", a custom we inherited from Spain. I also remembered my Grandma, she used to go to mass with a "mantilla" on her head every time.  She even looks like a bride, you'll see it in my process.  It was what I wore on my head the day I got married. So many memories Ms. Catrina brings to me!
So you don't lose perspective here's the original stamp
 
As you can see she's all there! Those beautiful roses get me every time!
Here's some of my process, I stamped her omitting the mask, her beautiful face is there, the only thing missing are the eyebrows, that you can easily draw as one big comma.  I had fun drawing her with sun glasses using her mask around the eyes.  Will share later!
 I wanted to place her in an old room, something forgotten by time, using the floral texture , from Prima's Floral Bouquet stencil as a peeled wallpaper, I also needed some white crackle for that old world feeling
 I used a very heavy coat trying to be careful around her gorgeous features
Although I will use my fave Prima watercolors for her features I couldn't resist mixing it up a bit and using acrylic paint on her.  You will see I used it on her roses, lips and her hair

Then I used the Prima watercolor pencils for her skin tones, (soft neutrals and spring and fall tins) are the ones I used

Inspired by a paper napkin I went with some turquoise to match her pink roses

and voila after some metal and hammer she's done!
I am hoping you feel inspired to transform some of your stamps
Have you used them in a different way, do share it with us on our Face Book page or leave me a note here for me to visit you! 
Until my next transformation!

 
Milagros
 
Supplies used
 
Catrina Bloom Girl Stamp
Wood Canvas
Prima's Floral Bouquet Stencil
Finnabair Modeling Paste and Crackle Medium
Faber Castell Pen
Liquitex Acrylics
Prima Watercolors
Metal, Hammer, Nails
Die Cut machine and dies

Tuesday, March 31, 2015

Sirena Jewelry Box with Milagros

Hi Bloom Girls! Milagros here with some brand new inspiration for you.  As part of our traditions here in the island we get from Spain "turrón" a spectacular almond nougat done only on Christmas.  They come in beautiful wooden boxes that I treasure. When we are done eating, to me they are
not trash, not an empty box but a box of possibilities....and that's the,way I see it!
I thought creating a jewelry box that you could hide in your wall disguised as art, was a clever idea, function and aesthetics in one cute little package! It already has hinges and closure!


now let's see how I did it!
 
 
 Now you are ready for your Bloom Girl, I chose to bring Sirena out of the water into a garden
Love that her name is in Spanish ;) it means mermaid!
I used modeling paste to give a raised effect with my stencil.  Believe it or not I'm using the new lace stencil, made to look like some hanging vines!!!
Here she is after some watercolor painting, I chose Prima's The Primary collection for their purple and acqua. 
 
I used some twinkling watercolors to give a wash to my vines
yeah she's taking a breath out of the water and she is liking it! And I love the effect of the SII, they make her hair flow

hardware

hinges
line with felt, another recycled item

hide some treasures
and hang your piece!


the closure is safely hidden from view by my metal embellishments


I hope to inspire you on this upcoming Earth Day to upcycle a project and add some beauty with your favorite Bloom Girl
 
Milagros
 
Materials used
 
Sirena Bloom Girl Stamp
Prima Lace stencil
Art Basics Heavy Gesso
Art Basics 3D Gloss Gel
Art Basics Modeling Paste
Prima Watercolor Pencils (The Basics, Soft Neutrals)
Prima Say it in Crystals
wood, metal, nails, hammer, pearls (in the same sentence, really!)
Spellbinders Die

Tuesday, March 24, 2015

Mother Tag by Lisa

Hi everyone! It's Lisa on the blog today and I have a tag to share with you featuring Jamie's Mother Bloom Girl and a few of her new stencils, too. This stamp is so beautiful and so detailed. It's just stunning. I loved working with it and putting my own spin on it.

(I really wanted to catch the coloring on her face for my main shot. I think she looks so beautiful and almost sad. But I love it.)

Here is what I did to create her:

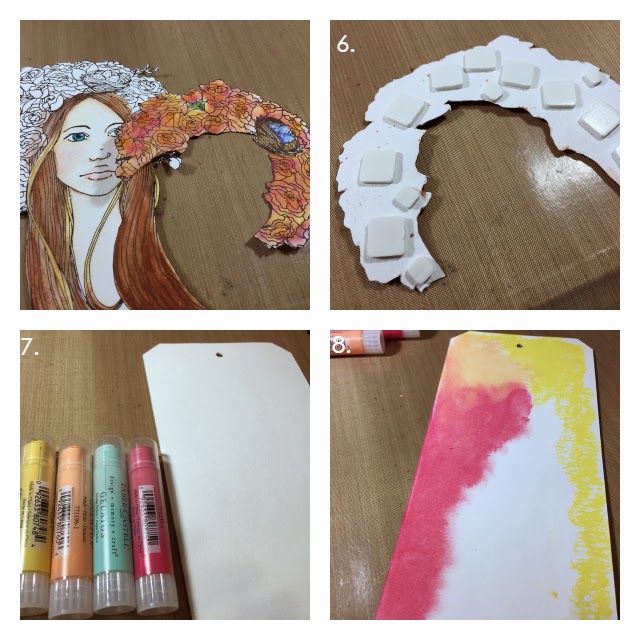
1 - 2. Stamp image twice onto watercolor paper using archival ink. (Second stamped image can only be of the floral portion of her head.)

3. Using watercolor pencils (or other medium of choice) color in the image.

4. Fussy cut the floral portion of the second stamped image and water color as well.

6. Apply foam adhesive on the back of the floral piece.

7. - 8. Using #10 Tag (4 1/8 " x 8 1/2")  and  Gelatos® in the following colors: Watermelon, Buttercream, Peach, and Acqua Dolce create background. Blend colors into each other using fingers or lightly damp rag.

9.Apply Crackle Paste in clear over the left side of the tag and let dry.

10. Stamp sentiment (which is included with the Mother Bloom Girl) in a black pigment ink, emboss with clear embossing powder, cut apart. Apply small foam adhesive to the back. Set aside.

11.  Using Jamie's Circle Stencils (medium) and Gold Texture Luxe™ paste create sun beam in upper right hand corner of tag.

12. Using the same paste dab over the crackled portion of the tag.

13.Apply Jamie's Criss Cross stencil to the right side of tag and using a white pigment pen, create random dots.

14. Go around edges of tag using Salty Ocean Distress Ink.

15. Apply more foam squares to the back of the entire cut out image. and apply to the tag front. Also apply sentiment at this time.

16. Highlight hair, eyes, and flowers with Wink of Stella, if desired.

Here's a little close-up!


You can see all the sparkle and shine...and the layers, too.

and here's another look at the whole tag:


Thanks so much for joining me today and thanks for your patience while I got my post uploaded today, ♥

Here are the Prims supplies I used:
Prima Bloom Girl Stamp (Jamie Dougherty Designs):  Mother– 980283
Prima Stencils:  Criss Cross – 980412,  Circles – 980429
Art Basics Crackle Paste, Clear – 961541


Tuesday, February 24, 2015

Clockwork Princess with Sherry

Hello my creative friends:) Sherry here to share with you my first project using the stunning 'Emily' in all of her gears and glory! With this being my first post, I must tell you how much I adore gears and anything mechanical. When Jamie released Emily and Quentin, my heart skipped a beat, and I knew my first project had to be filled with metallics and gears!

So follow along as I give you step by steps to this beauty:)

1- Gather chipboard clocks of two different sizes (and arms of the smaller clock), adhere metallic mega-flakes to full surface of both clocks.

2-Stamp multiple images of 'Emily' on white card stock, and one by itself on a 12x12 piece of white card stock for the base. Cut pieces from the other images that you want to pop out for the 3D effect, using pop dots adhere these 'stand out' pieces over the base image. (I chose to make pieces of her hair stand out!) Add some metallic accents using embossing powder.

3-Trace the inner circle of the largest clock. Cut out following just larger then the circle you traced, adhere this to the back of the large clock.
4-Gather chipboard gears of varying size and shape and add metallic accents using stamps and embossing powders.
5-Arrange gears on top of and peeking out from behind the large clock edges.

6- Take small chipboard clock and its arms from step 1 and add white embossing powder to tone down metallics. Arrange small clock and arms behind the assembled elements from steps 3-5.

7-Take out a fresh piece of white card stock. Use multiple background texture stamps, apply embossing powder in different tones of white. Use a background stencil and molding paste to create some beautiful layers of subtle white tones.
8-Using pop dots, adhere your assembled Emily clock to your background page. Add a few pearl gems to accent.
9-Tie it all together with small splatters of watered down white gesso. (make sure to cover up your Emily image to avoid splattering her!)

Supplies used:
Prima Bloom Girl-Emily (#980306)
Prima primary paper- white (#845797)
Prima 6.5"x10.5" bubbles stencil (#961299)
Prima art basics light paste (#961404)
Prima art basics heavy gesso -white (#961442)
Blue Fern Studios- large Roman clocks and gears
Indigo Blu Mega Flakes kit

Thank you so much for checking out my project and I hope you enjoyed! Stay tuned for more Bloom Girl inspired projects:)

xoxo


Thursday, February 19, 2015

Lacie Bloom Girl - Lisa Style

Hi Bloom friends! It's Lisa here with you today and I have a really neat way to use your beautiful Bloom Girls. I'm using Lacie today. She is from the newest CHA Winter 2015 release and she is GORGEOUS!!


Here's how I made her:

1. Cover the 5 x 7" sticky backed canvas with Prima Art Basics Clear Gesso (Item #961466). Allow to dry or heat set. 
2. Gather acrylic paints.
3. Apply acrylic paints in desired colors and in varied patterns. Allow to dry/heat set.
4. Stamp background with patterned stamp with dark Archival Ink (my preference is Black.)

5. Remove backing from sticky back canvas and stick to canvas. (*Tip - if necessary for good adhesion, apply Gel Medium to edges and dry.)
6. Place Bloom Girl Lacie on piece of vellum cardstock. Measure width of stamp and cut to size.
7. Stamp Bloom Girl Lacie in black pigment ink on vellum cardstock and use clear embossing powder to heat set.
8. Use watercolor pencils, Stamper's Big Brush Pens, and acrylic paints to color the beautiful stamp.
9. Use Color Bloom Sprays to accent the colors in her hair and the tattoo on her arm. (I shook them up and then dipped my paintbrush in to the spray bottle directly.)
10. I used the same acrylic paints for the background for her hair to tie the background and the stamp together, creating a cohesive look.
11. Placing Jamie's Spark stencil (Item # 980399) over the image and using my finger and white acrylic paint I simply rubbed the paint through the areas I wanted the image (or stencil) to show through. Super easy!
Here are some close-ups:


And here's another!


The additional things that I did to finish the piece off were to add some distressing to the edges of the vellum cardstock prior to wrapping and adhering it to the back. I also added just a touch of Journey Glaze to her lips and to the heart on her face to make it "pop".

I had no idea that the orange of the background piece would look so amazing through the vellum and look almost like skin! When I chose the colors - I picked them because I like them. What a happy accident. :)

Here are the products I used from Prima:
Jamie Dougherty Bloom Girl Lacie #980320
Jamie Dougherty Spark Stencil #980399
Prima Art Basics Clear Gesso #961466
Prima Color Bloom Spray Storm Cloud #573768
Prima Color Bloom Spray Tangerine #573935
Prima Color Bloom Spray Soft Teal #573782

I hope that you enjoyed this little canvas today!