Showing posts with label Bloom Girl. Show all posts

Monday, September 5, 2016

New Adventure!! Life book 2017!!

Exciting, fantastic, great news, I will be teaching on Life Book 2017 next year! Today we kick off the yearly blog hop with lots of giveaways! Hope you'll check it out: http://wp.me/p2lfgE-1yE


I can't wait to share with you creative techniques and ideas!! Stay tuned all month long for great blog hop giveaways and scholarships. 
Click here to find out more info about the workshop. Signups go live Oct. 1st. 


Thursday, October 15, 2015

Bloom Girl Peyton in a Vintage Christmas way

Hey everyone!

DT Stephanie here with you today to present Bloom Girl Peyton! As the holidays season approaches, I wanted to show you that all the Bloom Girls (and boy!) can be turned into a Christmas ornament, gift, home decor, and of course, cards! So this is the first of my (hopefully) long list of ideas!

As always, I stamped my image first, coloured it, and fussy cut with sharp scissors the parts I wanted to keep. You don't have to use the full image/design if you think something can't fit what you have in mind! Then, it's up to you to figure out a sketch for your card, starting with your favourite christmas patterned paper, and stunning pops of colours added by your embellishments.


Supplies used :
Bloom Girl Peyton stamp
Copic markers
Cryogen White cardstock
Memento Black Tuxedo ink
Mushroom weave trim from Prima, 577100
Metal embellishments - flowers from Prima, 960339
Peace and holly flowers from Prima, 584408
A Victorian Christmas 6x6 paperpad from Prima, 990541

Hope you like Peyton turned this way and make sure to share your own version on our Facebook Group!

Tuesday, September 29, 2015

love and....

hey everyone! Sherry here and I'm back after a bit of time off getting hitched!!! So get ready for an overload in projects, because my creative journal got filled with ideas and plans for projects while I was off:) It's funny how when a big moment in your life happens you become more sentimental! I have come to realize how much i need to appreciate the amazing, beautiful things that are in my life that i love and get over and forget the things that aren't in my life!!

Lets get this party started with a little bit of love for the 'Sirena' stamp and a fun candid picture form a fun weekend with our niece! I have to start by saying this is my favourite stamp from the last release and I don't think I would be able to stop using it!!! So she will be my girl for this one:) So head to your stash, pick up a few fave supplies and lets get creating!!

Step 1

Once deciding where I would place my main image, I decided where my stamp would be placed. (they would go in the top left section of the layout.) So that's exactly where I started, with a stamped image of 'Sirena". (tip: make sure to use a stamp pad with ink that won't react with whatever sprays you use to maintain a crisp clean image)

I applied Golden fibre paste through a stencil peeking out around where my photo would be, and overlapping a bit of of the stamped image. I also applied some stencilling in the bottom right corner as well. Allow to air dry.

Select 3 co-ordinating spray colors and unscrew their tops off.  Spray the stencilled areas with water. While the page is still wet use the 'straw' part of the sprayer and drag it along the edged of the paper and raised stencil areas. Dip the straw into the spray as much as needed to add more color. I made sure to apply all three colors together, while everything is still wet. I tilted the paper to allow for some beautiful drips.  This also allows them to slightly blend together.

Step 2


To add a few details and enhance the stencilling from the previous step I messy sketched around the shapes with a permanent thin sharpie pen. I really love the look of a messy outline look!!

Behind where the focal point/photo will be I arranges some thread to peek out from behind the photo.

Step 3

Next up, arrange all of the goodies I have pulled out. These embellishments were super simple but effective to the layout and photo:)

I started with an assortment of white flowers.  I sprayed then with the same spray colors from step 1.

A few tags, some scrap holes I cut off of watercolour paper pads and some flowers and I was set! I had a few leftover project life cards with the perfect sentiments for this layout!!

So the layering started, I made sure to arrange everything and generally lay it out before adhering anything down to make sure it looked good before making it permanent.

Once all of the embellies are stuck down and dry, I places a piece of scrap paper over my photo and took the same colors from Step 1 and splattered them over the stencilled areas... Then to tie it all together I added a few splatters of white gesso:)

And a few close ups!!!


The thing I love the most about this layout is that it doesn't need a ton of supplies to create!!!!
Thank you so much for popping in and checking out my first layout back:) For more from me pop into my blog or Facebook for more tutorials and product reviews and all things crafty! Also be sure to peruse around the BG blog to be further inspired by the amazing DT!

SUPPLY LIST
Prima Marketing
*Bloom Girl- 'Sirena' stamp (#980344)
*assorted white paper flowers (like these)
*white gesso (#961442)

Heidi Swapp
*citron spray (hs-01084)
*mint green spray (hs-00799)
*seafoam (hs-01080)

The Crafters Workshop
*hexagons stencil (tcw-324)

Golden
*fiber paste


Tuesday, August 4, 2015

Sunshine and Goldie!!!!!


Hey Everyone! Courteney here! 
The BEST thing about August is......... it's NEW release time. Boo ya!!! I am so excited and blown away, Jamie has done it again with some of the most creative and stunning stamps this release!!!!!!! I seriously can't even pick my favorite, they are all MUST have's. Today my inspiration was Jamie's NEW Bloom Girl "Goldie" she is all ready for summer and in the bright sun shine. I love her.

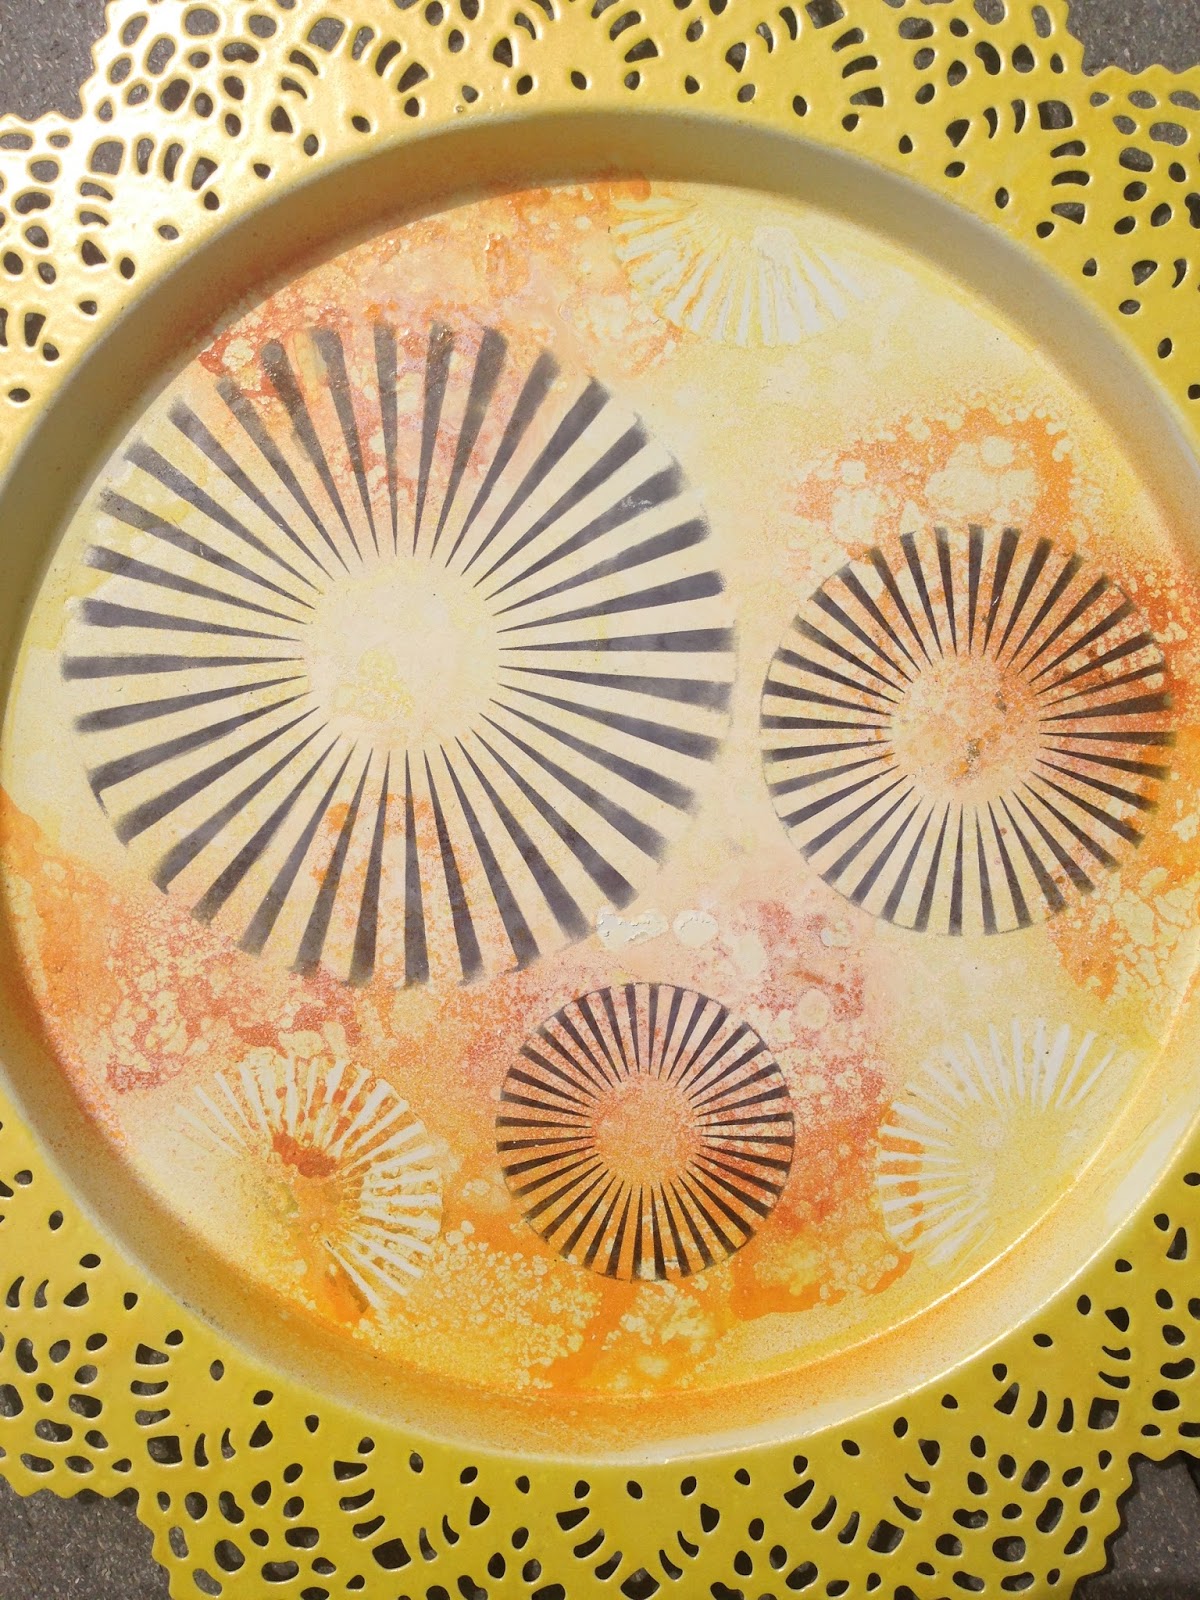
I was out shopping at Ikea just looking around when I came across this cool metal display plate and it reminded me of sun shine, so of course I had to get it. LOL! It's was a great price $6.99CND so really how could I go wrong. Here's how I Bloomed it up!!!! I hope you enjoy and play along!!!!


Step 1
Embossing!!!! Yup that's right the often forgotten but always fun technique works on metal!!!!!!! ***(WARNING: Metal gets SUPER hot)***
Taking my Tim Holtz Distress Ink in Squeezed Lemonade
I tapped it all along the outside rim of the plate adding Lindys Stamp Gang Scotch Broom Yellow             Embossing powder and heating with my heat tool. Only doing small sections at a time so my embossing powder stuck well. Turned out o bright and amazing.


Step 2
Color Bloom spray extravaganza!!!
Starting with my lightest color I sprayed spots in the center of my plate then drying with my heat gun. Color Bloom Sunshine first, Sorbet second and Glided third.
*** (WARNING: Metal gets SUPER hot)***


Step 3
Taking Jamie's circle stencil, black permanent ink and small sponge I added Black rays in each size in the middle of plate. Then taking a baby wipe and the small ray circle on the stencil I wiped away some color here and there around the inside of plate.


Step 4
Next and always my favorite part I colored Jamie's NEW Bloom Girl "Goldie" I stamped her onto Jamie's water color paper, then using a mix of Copics ( hair & skin) and Faber-Castell Aquarelle watercolor pencil crayon's (everything else) I colored her up. Once she was dry I cut her out.
Using Jamie's Circle stencil again I traced out serval rays onto watercolor paper and cut them out. Spraying some of them with my color bloom sprays used on the background and some I just coloured black. 


Step 5
So after stepping back and taking a closer look I decided my plate was way to YELLOW!!! Lol! I needed something to break it up. So taking a black acrylic paint I carefully painted the inside lip of the plate. (The part between the top edge and the bottom)
It worked! Thank goodness!!!!


Step 6
Layering! Layering! Layering! Sun Ray after Sun Ray! I cut most of them in 1/2 so I didn't have to make a million!!!
 Then taking a small tag cutout from Prima's Free Spirit paper line and a small piece of black card stock I pop dotted "Goldie" making her stand out more amongst all the layers.


Step 7
Just a few finishing touches adding Prima's "say it in Crystals" to the Center of 2 rays making them look like flowers. Adding some Prima leaves. I glossy accented the sun and rays on "Glodies" stamp. Then last but not least covering "Goldie" with a piece of paper towel, I splashed/sprinkled black acrylic paint all around the project.


Finished Project


Thank you so much everyone for stopping by,
 I hope you enjoyed my project and are inspired to play along!
xoxoxox
Courteney Gibson
 https://poshcreates.wordpress.com/


Supply List
980504- Bloom Girl Goldie
980429- Circles Stencil
980269- A4 Watercolor paper pad
573775- Sunshine Color Bloom Spray
573874- Sorbet Color Bloom Spray
573911- Glided Color Bloom Spray
579401- Timeless Memories Say it in Crystals 
574574- Cartographer Leaves
571917- Florella Flower Green Leaves