Showing posts with label Prima. Show all posts

Thursday, October 15, 2015

Bloom Girl Peyton in a Vintage Christmas way

Hey everyone!

DT Stephanie here with you today to present Bloom Girl Peyton! As the holidays season approaches, I wanted to show you that all the Bloom Girls (and boy!) can be turned into a Christmas ornament, gift, home decor, and of course, cards! So this is the first of my (hopefully) long list of ideas!

As always, I stamped my image first, coloured it, and fussy cut with sharp scissors the parts I wanted to keep. You don't have to use the full image/design if you think something can't fit what you have in mind! Then, it's up to you to figure out a sketch for your card, starting with your favourite christmas patterned paper, and stunning pops of colours added by your embellishments.


Supplies used :
Bloom Girl Peyton stamp
Copic markers
Cryogen White cardstock
Memento Black Tuxedo ink
Mushroom weave trim from Prima, 577100
Metal embellishments - flowers from Prima, 960339
Peace and holly flowers from Prima, 584408
A Victorian Christmas 6x6 paperpad from Prima, 990541

Hope you like Peyton turned this way and make sure to share your own version on our Facebook Group!

Tuesday, August 18, 2015

Free, a mechanicals dream

Hi Bloom fans!!! It's Milagros today continuing the showcasing of Jamie's awesome birds stamp. I will be using the smallest guy for my project    You see a while ago I found this metal birdcage and saved it for a project, and totally forgot all about it.  As I was looking on my craft room I saw it on my shelves and asked myself what if?   Well the smallest bird fit perfectly, but I was determined to set him free!
And also I wanted to explore different avenues rather than go with the expected watercolors , another what if on my brain!
So here's my process
Carefully cut your bird after stamping 
Use Black gesso to alter Jamie's floral embellishments 
Give a coat of white crackle texture paste to the birds chest 
Lay it on thick for nice crackles and leave aside to dry 
It's a good moment to add some microbeads while it's wet
I was looking at my jar of mica flakes 
thinking another what if... So I gave my bird a metallic silver paint coat and 
over it I took my sharp tweezers and picked and adhered each piece of flakes to simulate feathers. I used the frosted color. For the head I painted the crown in gold leaf and the cheeks in 3D Gloss gel to hand apply more mica flakes
For the eyes I used 3d Gloss Gel with a fine brush and then I filled it with bronze microbeads 
Can you tell the cracks are beggining to appear?
I think the shimmering result of the hand applied mica flakes make it look stunning!
He's now free to wander...
Thanks for stopping by I hope you have enjoyed my mechanical bird and inspired you in trying your own!
Milagros 

Thursday, June 25, 2015

CAS your Bloom Girls tutorial by DT Stephanie

Good morning everyone!

Stephanie with you today to show you how you can create two Clean & Simple cards with the Bloom Girls, perfect and ready for every occasion!


Here's what you'll need:

Two Bloom Girls images stamped and coloured (I used Joy and Paige)
Neutral flowers
3 sheets of cardstocks
2 sheets of patterned papers
Some twine
3D foam adhesive


First step is to cut your coloured image to a decent size for mail. Standard cards are 4"x6", however I usually do 5.5" square, but the idea remains the same ; cut it at 3/8" from the measurements of your base.


With the tip of a black marker, carefully trace the edges as a finishing touch.


Now, cut your patterned paper at 3/16" from the measurements of your base, fitting right under your image.


Adhere everything together with double-sided tape.


You could also pop up your image with 3D foam dots, for more dimension.


Add a row  (or two, or three!) of twine and stick it behind your image before adding the whole layer to the cardbase.


That's it, we're done! Add one or two flowers in a corner and you can do the same process with your second image.


And here's the final look!


Please note that I jazzed things up a little bit on the second one by adding a red cardstock between the base and the pattern paper. I couldn't resist, but it's still very CAS!!


Thanks for coming by :-) xx

Thursday, June 11, 2015

Watercoloring Paige


Hi Bloom Girl fans! Carisa here with you today and I'm sharing a simple one layer watercolor card using Paige from the Prima Bloom Girl collection! I have had this stamp in my stash for quite awhile and this my first time stamping and coloring her.


I am using the Zig Clean Color Real Brush pens to do all of my watercoloring and I have a video for you sharing my process and thoughts on these markers. I love creating simple cards using the stamps from the Bloom Girl collection, in fact, I stamped all my girls onto the same Strathemore watercolor cards to create a few different cards to have on hand. These stamps are so beautiful and you can add as much color or as little and they still look beautiful on your cards. A simple sentiment to let someone know you are thinking of them and you are good to go.


I hope you enjoy the video and I will see you next month with another Bloom Girl project!


Supplies:
Prima Bloom Girl (Paige) Item #980054
Zig Clean Color Real Brush Pens: (skin) 071 Flesh Color, 028 Pale Pink, 072 Beige, 021 Light Carmine / (hair) 038 Peacock Blue, 010 Black / Teacup 092 Blue Grey, 063 Ochre, 065 Mid Brown, 066 Oatmeal, 062 Dark Brown / Flowers 003 Fl. Pink, 051 Lemon Yellow, 052 Bright Yellow, 083 Lilac, 045 Pale Green, 091 Light Grey / Background 036 Light Blue
Strathmore 5x7 Watercolor Cards
Tsukineko Versafine Ink (Onyx Black)
Zig Wink of Stella (clear) 
WPlus9 Sentiment (Doodle Buds stamp set)
Ranger Watercolor Brush

Tuesday, June 9, 2015

Quentin is ready for Father's day!

Hey everyone!

DT Stephanie here with you today to showcase a very simple card with Quentin, perfect for Father's day!


Here's what we'll be using:


First, cut your cardbase at usual dimensions. Mine are always 5.5" square, but it's totally up to you!


Add two layers of cardstock and one patterned paper.


Now to cut another layer, this time at 4" square.


Add three layers of cardstock.


Glue them all together.


Add some brads in each corner of the biggest layer.


Add twine/ribbon in the bottom of the biggest layer.


Put some 3D foam adhesive behind the smaller layer.


Attach everything together, including your stamped coloured image.


Final step : embellish with your favourite metal buttons and trinkets!


Here's a look at the finishing piece.


Close-ups...


I hope you liked this quick tutorial and don't forget to share your take on our Facebook group!


Thursday, May 28, 2015

My Boy, using handsome Quentin!

Hey my lovelies, Sherry here with another fab, fun way to use the ever amazing Bloom Girl (Boy) stamps! Today I am turning Quentin into a metallic element in my layout background. Sometimes we feel the stamps need to be in the forefront of everything we use them in, but they in fact add an amazing layer into backgrounds as well.

First off here's a look at the full project we will be creating today! At the bottom you will find a full list of supplies. Pull out all your goodies and create along with me!!

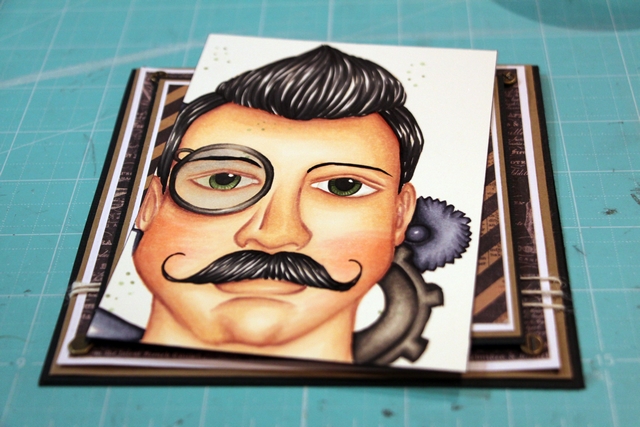
Knowing i wanted a pretty neutral colour scheme for the base of this project i selected pattern paper accordingly and started with my first two layers. First I applied Prima fluid chalk ink through the Ricket stencil (MY FAV) to the are my photos will be places and a little in the opposite corner to create balance. Then using a kit that turns stamped images into metallics I stamped Quentin so that he would peek out from behind my photos. (Remember I don't want him in the forefront, he is in the background of this layout!)
 And a few close ups so you can see the yummy metallicy, goodness!


I laid my photos where I would want them to be and traced lightly around them to mark where my photos would end up. Using the 'sweet tea' stencil i sprayed Bloom spray through the large open section of the stencil. (make sure to cover up the intricate side to avoid spray going through it) allow to dry. Then using molding paste apply it though the intricate side onto the sprayed silhouette. Allow to dry.


I wrapped cream colored piece of string around my hand making messy circles. I adhered these so they would peek out from behind my photos.


I took a gear mask and applied molding paste around Quentin like a halo, and a little bit in the bottom right corner just for a bit of fun! (the bottm right corner will also be the home for the title!) Once the paste if dry i lightly rubbed brown ink over the image to make it not so stark against the background.

Now the fun part!!! I took bit and pieces that were hanging out on my desk and used them as backgrounds for my photos! Keeping in mind where my photos will be I arranged all of goodies (mechanicals, Bloom Girl metal flowers and paper flowers) to peek out and enhance my layout.(HINT: I laid all these out before adhering them so I knew they would suit what I wanted and fill in the spaces I needed.) Once these are set and dry I used micro beads in small random spaces around the photos and dragged out from the top and bottom! Once all is dry and set, I dry brushed white gesso over the embellishments. Allow to dry.


Not lets add some color!!! With a fluffy brush I sprinkled my first of three Magical color in the desired areas and spray with water to active, and allow to dry. Then redo this same thing with the next two colors. once they are all dry i reapplied the colors until they reached the desired color that i loved!!

And a few close ups of this deliciousness!


Thank you so much for popping in and checking out my tutorial! For more inspiration, tutorials and projects please feel free to check out my blog, facebook and instagram.


Full Supplies:
BLOOM GIRLS
-Quentin stamp (#98037)
-Ricket stencil (#980405)
-Sweet Tea stencil (#980351)
PRIMA
-Archivist Collection 'Atteindre L'univers' (#990244)
-Glass beads, 'Butter' (#961701)
-Art Basics white Gesso (#961442)
LINDY'S STAMP GANG
-Magicals: Sandra Dee Sepia, T-bird Turquoise,