Showing posts with label Mixed Media. Show all posts

Monday, November 28, 2016

Creative JumpStart 2017 !!!!


I'm excited to announce that I'll be participating as an artist in Creative JumpStart (CJS) 2017, now available for the 6th time by Nathalie Kalbach. If you're not familiar with CJS, it's a one-of-a-kind online event to kick your creativity into high gear in January 2017. 
Learn techniques, discover new materials, and connect with other artists and crafters. 
Throughout January participants get access to 27 downloadable videos from 27 featured artists. I'm honored to be one of those artists, called “JumpStarters.” See for yourself:


Announcing Creative JumpStart 2017 - CJS17 from Nathalie Kalbach on Vimeo.


Head on over to Nathalie's site to sign up and for more details: http://tinyurl.com/jb4d3vm
You get 27 videos for just $40 (USD) if you sign up before November 30th, (11:59 pm (EST), 2016. Afterwards it will be 45USD until December 31st, 2016 before it goes to its normal sale price of 50USD. 

So what are you waiting for? Sign up here at  Creative JumpStart 2017


Hugs and happy Creating!!

Jamie


Thursday, September 22, 2016

Life Book 2017 Blog Hop & Give Away

Hello everyone!

I have some wonderful and exciting news! I am going to be teaching
in Life Book 2017 next year!  I am beyond words of how excited I am to be a part of this amazing group of artists! This will be a growing experience for me as much as it will for those who will be joining us.


Even MORE exciting news is that I get to give away 1 space to this amazing year long art
course! Keep reading if you want to find out more about Life Book 2017 Click here to view more details and if you want to find out how you can win a spot! :)

First let me tell you a bit more about Life Book in case you haven't heard about it yet!

“Life Book, a celebration and honoring of YOU” is a year-long mixed media art class
organized by Tamara Laporte from Willowing Arts.

Tam is joined by 22 incredible art teachers who are all gearing up to share their mixed media techniques, tips and tricks with YOU! Themed around self-development and healing, you’ll be creating several loose mixed media art journal pages per month which by the end of the year you will bind into a glorious journal (a Life Book)! You will have a wonderful keepsake that you can treasure for the rest of your life!

You can find out a lot more about this wildly popular course (it has been joined by over 12500+ people in the past!) by clicking HERE .

I haven't fully developed my class idea yet, but I'm excited to be sharing my mixed media skills and outside of the box ideas with all of you. We will include watercolors, among other mediums that you often find in my style. much like you can see in this painting:

 Registration opens on October 3rd 2016 and the class begins on January 1st 2017.

So if you want to start the year with a fabulous creative BANG and spend 2017 with a wonderful creative community of like-minded souls, learning more about art and how to be kinder and more loving towards yourself, be sure to join once registration opens! :) Keep this page bookmarked so that you can sign up the moment it goes on sale! :)
Now then, onto the give-away and blog hop! :) I can give away 1 space on Life Book 2017 to 1 lucky winner, woohoo!! :) And if you follow the blog hop (see below for links and dates) you can up your chances of winning a space by entering all the other give-aways also! :)
How to enter the give-away
1.Share this give-away on Facebook, Twitter, Instagram or Google+

2.Sign up to my newsletter (click here)

3.Leave a comment below letting us know why you would love to join Life Book 2017

I will announce the winner on September 25th, 2016.

Join me on my Facebook page for all upcoming works of art and available workshops.

Here is the list of the other amazing teachers who will be teaching on Life Book – they too will be giving away a spot on Life Book so go check them out and enter their give-aways!


5th September 2016   Tamara Laporte      http://www.willowing.org/blog/
6th September 2016   Jodi Ohl                  http://sweetrepeats.blogspot.com
7th September 2016   Susana Tavares     http://ateliersusanatavares.blogspot.com
8th September 2016   France Papillon      http://www.france-papillon.com/blog
9th September 2016   Shelley Klammer    http://intuitivecreativity.typepad.com/
10th September 2016 Amber Kuileimailani Bonnici http://www.theradiantmama.com/
11th September 2016 Donna Mulholland   http://www.donnamulhollandstudio.com/blog
12th September 2016 Mandy van Goeije   https://www.mandyvangoeije.com/blog/
13th September 2016 Jennifer Mercede    http://www.jennifermercede.com/blog/
14th September 2016 Misty Mawn             http://www.mistymawnart.com/blog
15th September 2016 Gwenn Seemel       http://www.gwennseemel.com/blog
16th September 2016 Melissa Dinwiddie   http://melissadinwiddie.com/blog
17th September 2016 Vicky Papaioannou http://www.clips-n-cuts.com/
18th September 2016 Lindsay Weirich       https://thefrugalcrafter.wordpress.com/
19th September 2016Julie Fei-Fan Balzer http://balzerdesigns.typepad.com/balzer_designs/
20th September 2016 Effy Wild                  http://effybird.com/
21st September 2016 Wendy Brightbill      https://agirlandherbrush.wordpress.com/
22nd September 2016 Jamie Dougherty    http://jamiedoughertydesigns.blogspot.com/
23rd September 2016 Andrea Gomoll        http://andrea-gomoll.de/blog/
24th September 2016 Whitney Freya         http://www.whitneyfreya.com/blog
25th September 2016 Annie Hamman        http://www.anniehamman.com/blog/
26th September 2016 Connie Solera          http://www.dirtyfootprints-studio.com/blog
27th September 2016 Leilani Joy                https://www.youtube.com/MissLeilaniJoy

Good luck and I look forward to meeting new faces and creating with old friends 
Happy Creating

Monday, September 5, 2016

New Adventure!! Life book 2017!!

Exciting, fantastic, great news, I will be teaching on Life Book 2017 next year! Today we kick off the yearly blog hop with lots of giveaways! Hope you'll check it out: http://wp.me/p2lfgE-1yE


I can't wait to share with you creative techniques and ideas!! Stay tuned all month long for great blog hop giveaways and scholarships. 
Click here to find out more info about the workshop. Signups go live Oct. 1st. 


Monday, December 21, 2015

Our Faith in Motion

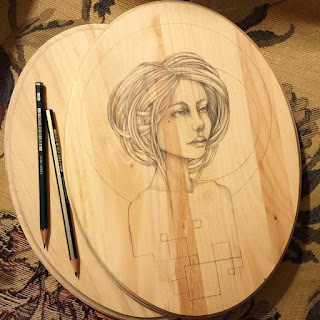
I have been working on a series called Faith In Motion. or emotion. I love sharing my art and my faith with people and I try to create pieces that others can relate with. Here are a couple in the series.

Supplies I used were wood panels, Acrylic paint by Liquitex and Deco Art, Paint brushes by Princeton Brushes, Graphite pencil by Faber-Castell, copper leafing,

Thank you and I hope you enjoy this series as much as I have creating it.

"Rooted In Faith"

 
                                    "Duality"


And a little work in progress


Merry and Blessed Holiday Season and Happy New Year.
Jamie


Wednesday, December 16, 2015

Creating In Faith


Many of you now know that I recently came out with a new line called Creating In Faith. I would like to thank Prima Marketing Inc. for allowing me to release this collection with them and share my love for my faith as well for art. Many stores now have it in stock but if you haven't had the chance to see the collection, the full line will be at CHA! I am so excited to share with you all the possibilities of this collection and will be demoing during the show! I will also be doing a few periscope shows while at CHA so if you are unable to attend CHA, you too can see all of the new products coming out. I hope you can join me. For up to date information make sure to follow me on my Facebook Pages...

Jamie Dougherty Designs
Creating In Faith with Jamie Dougherty

AND

If you would like to join us in your walk with faith check out our Creating In Faith group as well.


Here is the Live With Prima video I did, showing you how you can recreate this look :) 


I Hope you enjoy
Jamie

Thursday, October 22, 2015

Catrina's time to shine!

Hey everybody where did the month go? OMG it's almost gone!!! Well I think it's time we dust ourselves this beautiful lady and bring her back out to celebrate All Hollows Eve and Dia de Los Muertos they are both pretty close to each other and Miss Catrina is our perfect Bloom Girl to helps us set the mood!
You know when you have an idea buzzing in your brain and you find what you're looking for? Well today I set up to find just that! Here's my finding and subsequent transformation!
I thought it would be the perfect size for my stamp but it was a tad smaller, no reason to stop!
I took my glass out and armed with StazOn I stamped my girl.
Next step in creating a faux stained glass effect was to trace the image using Pebeo Cerner Relief
Once traced leave it to dry. Of course I couldn't just sit and wait right!
I decided she would pop more if I painted the lantern black!
Looking perfect
Now to color it in I tried using a paint brush but the result was undesirable. I had a streak mark, not what I was going for!!! Then I remembered the needle applicators for Dina Wakleys acrylic paints and that was the perfect thing. It was like flooding a cookie with icing in between my " solder lines"! I've posted a video on my Twitter feed @paperboutiquesb that can show you how I did it. It's also on the FB page of the Bloom Girls
You can find another short video on faux soldering on my Instagram feed @milagroscrivera
For the lantern sides I had a little helper who got all excited when coming from school to find this project and begged me to help!
She's so intense, and yes you can totally engage your kids in helping you with this type of projects, and don't mind my mess, creative mind at work!

Time to enjoy my creation at home!
Here's the palette of colors I used just in case you are inspired to give it a go

Happy haunting my friends!!!

Milagros

Tuesday, September 29, 2015

love and....

hey everyone! Sherry here and I'm back after a bit of time off getting hitched!!! So get ready for an overload in projects, because my creative journal got filled with ideas and plans for projects while I was off:) It's funny how when a big moment in your life happens you become more sentimental! I have come to realize how much i need to appreciate the amazing, beautiful things that are in my life that i love and get over and forget the things that aren't in my life!!

Lets get this party started with a little bit of love for the 'Sirena' stamp and a fun candid picture form a fun weekend with our niece! I have to start by saying this is my favourite stamp from the last release and I don't think I would be able to stop using it!!! So she will be my girl for this one:) So head to your stash, pick up a few fave supplies and lets get creating!!

Step 1

Once deciding where I would place my main image, I decided where my stamp would be placed. (they would go in the top left section of the layout.) So that's exactly where I started, with a stamped image of 'Sirena". (tip: make sure to use a stamp pad with ink that won't react with whatever sprays you use to maintain a crisp clean image)

I applied Golden fibre paste through a stencil peeking out around where my photo would be, and overlapping a bit of of the stamped image. I also applied some stencilling in the bottom right corner as well. Allow to air dry.

Select 3 co-ordinating spray colors and unscrew their tops off.  Spray the stencilled areas with water. While the page is still wet use the 'straw' part of the sprayer and drag it along the edged of the paper and raised stencil areas. Dip the straw into the spray as much as needed to add more color. I made sure to apply all three colors together, while everything is still wet. I tilted the paper to allow for some beautiful drips.  This also allows them to slightly blend together.

Step 2


To add a few details and enhance the stencilling from the previous step I messy sketched around the shapes with a permanent thin sharpie pen. I really love the look of a messy outline look!!

Behind where the focal point/photo will be I arranges some thread to peek out from behind the photo.

Step 3

Next up, arrange all of the goodies I have pulled out. These embellishments were super simple but effective to the layout and photo:)

I started with an assortment of white flowers.  I sprayed then with the same spray colors from step 1.

A few tags, some scrap holes I cut off of watercolour paper pads and some flowers and I was set! I had a few leftover project life cards with the perfect sentiments for this layout!!

So the layering started, I made sure to arrange everything and generally lay it out before adhering anything down to make sure it looked good before making it permanent.

Once all of the embellies are stuck down and dry, I places a piece of scrap paper over my photo and took the same colors from Step 1 and splattered them over the stencilled areas... Then to tie it all together I added a few splatters of white gesso:)

And a few close ups!!!


The thing I love the most about this layout is that it doesn't need a ton of supplies to create!!!!
Thank you so much for popping in and checking out my first layout back:) For more from me pop into my blog or Facebook for more tutorials and product reviews and all things crafty! Also be sure to peruse around the BG blog to be further inspired by the amazing DT!

SUPPLY LIST
Prima Marketing
*Bloom Girl- 'Sirena' stamp (#980344)
*assorted white paper flowers (like these)
*white gesso (#961442)

Heidi Swapp
*citron spray (hs-01084)
*mint green spray (hs-00799)
*seafoam (hs-01080)

The Crafters Workshop
*hexagons stencil (tcw-324)

Golden
*fiber paste


Tuesday, September 15, 2015

Crafts and Bloom Girls... What could be better?

A chance to win a free workshop, that's what!!

I am so excited to share with you a sneak of my first and upcoming workshop with Craftsy. They are such an amazing company and you will love this workshop. If you are just starting out in the art mediums world with will be a great workshop to start with.


I will be sharing how to get started with watercolor pencils and Copic markers. I will give you tips and techniques on how to use the mediums on your stamped images and how they can also work well together.


The workshop will be available September 28th but until then, go over and enter for your chance to win the workshop for free! You have until September 27th to enter.

Click HERE for your chance to enter.

Good luck and Happy Creating


Tuesday, August 18, 2015

Free, a mechanicals dream

Hi Bloom fans!!! It's Milagros today continuing the showcasing of Jamie's awesome birds stamp. I will be using the smallest guy for my project    You see a while ago I found this metal birdcage and saved it for a project, and totally forgot all about it.  As I was looking on my craft room I saw it on my shelves and asked myself what if?   Well the smallest bird fit perfectly, but I was determined to set him free!
And also I wanted to explore different avenues rather than go with the expected watercolors , another what if on my brain!
So here's my process
Carefully cut your bird after stamping 
Use Black gesso to alter Jamie's floral embellishments 
Give a coat of white crackle texture paste to the birds chest 
Lay it on thick for nice crackles and leave aside to dry 
It's a good moment to add some microbeads while it's wet
I was looking at my jar of mica flakes 
thinking another what if... So I gave my bird a metallic silver paint coat and 
over it I took my sharp tweezers and picked and adhered each piece of flakes to simulate feathers. I used the frosted color. For the head I painted the crown in gold leaf and the cheeks in 3D Gloss gel to hand apply more mica flakes
For the eyes I used 3d Gloss Gel with a fine brush and then I filled it with bronze microbeads 
Can you tell the cracks are beggining to appear?
I think the shimmering result of the hand applied mica flakes make it look stunning!
He's now free to wander...
Thanks for stopping by I hope you have enjoyed my mechanical bird and inspired you in trying your own!
Milagros