Showing posts with label Liquitex. Show all posts

Monday, December 21, 2015

Our Faith in Motion

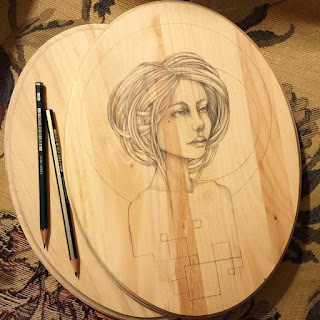
I have been working on a series called Faith In Motion. or emotion. I love sharing my art and my faith with people and I try to create pieces that others can relate with. Here are a couple in the series.

Supplies I used were wood panels, Acrylic paint by Liquitex and Deco Art, Paint brushes by Princeton Brushes, Graphite pencil by Faber-Castell, copper leafing,

Thank you and I hope you enjoy this series as much as I have creating it.

"Rooted In Faith"

 
                                    "Duality"


And a little work in progress


Merry and Blessed Holiday Season and Happy New Year.
Jamie


Thursday, April 30, 2015

You and Me


Ladies and gents... the time has come (almost;)) don't forget to read to the bottom of this post for PART 2 of courteney and my contest give away!!!!!

But, before we get to all of that excitement, lets check out a super fun tutorial I did for a layout using sprays and stencils and all sorts of delicious goodness!

As I start almost all of my layouts, I adhered my pattern paper to a heavy chipboard piece to give the layout support and structure.
I chose two complimentary colored (purple and yellow) sprays. Starting with my 'main' color (yellow) I sprayed a large section towards the top right areas of the page. I wanted a pretty solid area covered so I made sure to use even, firm pressure pushing the sprayer all the way in. I also wanted to allow some to pool so I could tilt the page to create drips. Allow this to dry completely, this will allow the colors to stay separate and not mix/blend together as that isn't the look I am going for today!
Taking my second color (purple) I wanted splatters so I used quick, short, pulse type stroked on the sprayer to create the splatters. Making sure to keep the spray bottle aprox 12" front the paper to allow the drops to splatter some when they hit the paper! Allow to dry completely.
Using the Bloom Girl ricket stencil I applied matte gel medium through stencil onto the layout on top of the sprays! its important that the sprays are dry before you apply this of the paste will pick up some of the spray color!
Apply super heavy gesso through the Bloom Girls 'wings' stencil and allow to dry!


I laid my picture onto the layout where it was going to be placed in the end and traced around it with a pencil, this will allow be to add stamping and know what will peek out from the photo.
then I went nuts with my borer stamps, I like to primarily keep my linear stamps all going in the same direction (in this layout they're all primarily vertical) as opposed to going horizontal, vertical and diagonal! I stamped all along the photo and a little bit in the bottom left corer, this made me feel like the layout was balanced to the eye.

I pulled out my 'Sharon' stamp and inked up just the butterflies around her head. Making sure to mask off the rest of her face and hair I stamped the butterflies around the edge of where the photo would be. Allow the ink to dry completely. Then I rubbed white gelato over the image of the butterflies and gave it a second to set. Using a small paintbrush I painted the butterflies using sprays(orange/yellow) and gelatos (blue). Allow these to dry.
Using a fun rub-on saying I added 'you + me' so it would sit along the bottom right edge of my photo!


BOOM!!!! add a photo with pop dots and we have a fun layout with some fun layers and visual texture!!!

And a few close up pics of this fab layout! THANK YOU for checking it out and playing along!! head over to my blog for more inspirations, tutorials and how-tos!! 

Supplies:
PRIMA
Bloom Girl
-'ricket' stencil (#980405)
-'wings' stencil (#980443)
-Sharon stamp (#980177)
Other Prima
-Bloom Sprays:
Sorbet(#573874)
Iris(#573744)
-Sunrise/Sunset collection 'Celcius' (#960018)
-Metal Paperclips, butterflies (#564643)
-Timeless Memories, metal trinkets (#579791)

OTHER
-Liquitex, Super Heavy Gesso
-IndigoBlu, Limor Webber, Rugged Edge Stamps
-Dylusions Spray: Pure Sunshine (DYC33929)
-Faber-Castel, Gelato: metallic blue
-My Minds Eye, Jubilee: Rub-ons (#JB1069)

Now its CONTEST TIME!!!!
Comment on this post and Courteneys post form the beginning of the month=2 ballots
Comment on Courtemey's blog, poshcreates.wordpress.com =1 ballot
Comment on my personal blog, beautifulmess5891.wordpress.com =1ballot
Share both this post and Court's post =1 ballot

All ballots go towards a fab gift package, good luck!!!!

XOXOXO
Sherry 

Tuesday, April 21, 2015

Unmasking Catrina with Milagros

Hi Bloom Fans, Milagros here as your host today!
There's still a few more months for the day of the death so I decided to reveal the beauty of the lady behind the mask.  The roses in her hair are divine.  I recall when seeing her for the first time noticing she was wearing a headdress we know as "mantilla", a custom we inherited from Spain. I also remembered my Grandma, she used to go to mass with a "mantilla" on her head every time.  She even looks like a bride, you'll see it in my process.  It was what I wore on my head the day I got married. So many memories Ms. Catrina brings to me!
So you don't lose perspective here's the original stamp
 
As you can see she's all there! Those beautiful roses get me every time!
Here's some of my process, I stamped her omitting the mask, her beautiful face is there, the only thing missing are the eyebrows, that you can easily draw as one big comma.  I had fun drawing her with sun glasses using her mask around the eyes.  Will share later!
 I wanted to place her in an old room, something forgotten by time, using the floral texture , from Prima's Floral Bouquet stencil as a peeled wallpaper, I also needed some white crackle for that old world feeling
 I used a very heavy coat trying to be careful around her gorgeous features
Although I will use my fave Prima watercolors for her features I couldn't resist mixing it up a bit and using acrylic paint on her.  You will see I used it on her roses, lips and her hair

Then I used the Prima watercolor pencils for her skin tones, (soft neutrals and spring and fall tins) are the ones I used

Inspired by a paper napkin I went with some turquoise to match her pink roses

and voila after some metal and hammer she's done!
I am hoping you feel inspired to transform some of your stamps
Have you used them in a different way, do share it with us on our Face Book page or leave me a note here for me to visit you! 
Until my next transformation!

 
Milagros
 
Supplies used
 
Catrina Bloom Girl Stamp
Wood Canvas
Prima's Floral Bouquet Stencil
Finnabair Modeling Paste and Crackle Medium
Faber Castell Pen
Liquitex Acrylics
Prima Watercolors
Metal, Hammer, Nails
Die Cut machine and dies

Monday, December 1, 2014

Creative JumpStart 2015 is Coming!!!

I'm excited to announce that I'll be participating as an artist in Creative JumpStart (CJS) 2015, run by Nathalie Kalbach. If you're not familiar with CJS, it's a one-of-a-kind online event to fire up your creativity in Jan 2015. 


Learn techniques, discover new materials, and connect with artists and crafters. 
Throughout January participants get 25 videos from 23 featured artists. I'm proud to be one of those artists, called “JumpStarters.” See for yourself:
 video here>
Head on over to Nathalie's site to sign up and for more details: http://nathaliesstudio.com/shop/online-workshops-ubermedia/creative-jumpstart-2015/
You get 25 videos for just $25 (USD).
But wait – it gets better: if you sign up today you’ll get $5 off. Just use this coupon code during checkout:
cybercjs
*This is a limited offer valid from 9:00 am Dec 1, 2014 to 8:59 am EST on Dec 2, 2014.
So what are you waiting for? Sign up here, and apply the coupon code during check out process
CJS 2015 is proudly sponsored by Liquitex.


Creative JumpStart 2015 Trailer from Nathalie Kalbach on Vimeo.


Happy Creating


Sunday, June 1, 2014

Blooming Through The Seasons

A new year long workshop is set to kick off on July 1st!!! This twelve month set of classes will show you how to create a duel page art journal entry each month. Each one you will learn new techniques, new products, and a new Bloom Girl!!! On top of all of that...you will also learn how to draw a flower that corresponds with the month we are working in. This is a creative journey to learn a little bit about art, others, and yourself. Take each month and find what inspires you, what drives you to be who you are.


You have three options to sign up; 12 month, 6 month, or 3 month subscriptions. You will receive three months worth of videos and corresponding information each quarter. At the beginning of each quarter you will also receive a full list of supplies you will need to complete the journal pages. You will have the ability to work at your own pace and learn in the comfort of your own home. I hope you can join this artistic journey with us and find a piece of yourself through the seasons. (Just some of the products we'll be jumping into: PanPastel Colors, Faber-Castell USA Art & Graphic Design Memory Craft, Ranger Ink, Prima Marketing Flowers, Colourcraft C&A Limited, Grumbacher - Official Fanpage, Golden Artist Colors, Liquitex Artist Materials, ect...) To sign up go to....


Happy Creating!!


Monday, July 30, 2012

Painting with Masking Tape...

I had a wild hair this weekend and wanted to try something different. I love the clean lines you get when you paint with masking tape so I thought why not give a original design a go. I have this crush on wood lately and I hate when paint runs in the grain of the wood sometimes. So...I HAD to try out the tape. Here is what I came up with...


Supplies: Piece of Beech wood 1'x2' that I got at Michaels Crafts, black spray paint by Krylon, Yellow and pink spray paint by Liquitex, white paint pen by Sharpie, Masking tape by Frogtape 


Here is a quick still action video I made on how I created this piece. I had so much fun making this but man did it take a lot of photos lol If you have any questions please feel free to ask. 


The original piece is now available on Etsy here.

If you try out this technique even if it's as simple as a few squiggles on a canvas, I would love to see it!!


Thank you so much for stopping by my blog; have a wonderful and creative week.

Jamie D.

www.jamiedoughertydesigns.com