Zoey's here again after a few weeks I took off to "deal with life" -- and as always everytime I need to find myself, here's come "the ART" that saves me and put me back on my happiness cloud!
And today's post is all about celebrating the fact we all need to step back sometimes, take a deep breath..and most of all take our time!
With these words in my head, I created two ATCs. Jamie Dougherty Design stamps are perfect for ATCs even if they are bigger than a normal stamp -- who said you HAVE to stamp the whole image? Sometimes all you need is a small part of the stamp!
What I used to create these ATCs :
From Prima Marketing:
- Bloom Cling Stamp Sirena (#980344)
- Bloom Cling Stamp Hope (#980047)
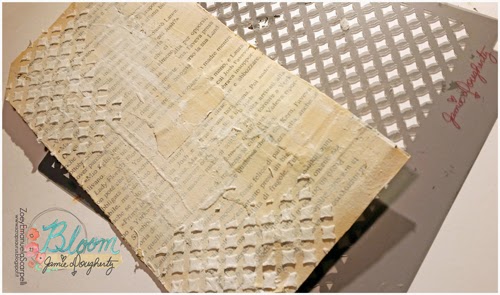
- 6x6 Stencil Spark (#980399)
- Cartographer A4 Paper Pad (#990152)
- Art Basics 3D Matte Gel (#961398)
- Art Basics Heavy Gesso (#961442)
- Bloom Sun Kissed (#575182)
Other:
- Stickers
- Cheesecloth (thanks Lisa!)
I started off by cutting two pieces of cardboard into an ATC size and then I covered them with a piece of paper from the collection Cartographer.
To glue the paper down I used Art Basics Soft Gel and then I ripped off few pieces here and there. I have to admit that it was a bit hard to do as the paper are thick but I somehow managed to get the paper off how I wanted them to!
To glue the paper down I used Art Basics Soft Gel and then I ripped off few pieces here and there. I have to admit that it was a bit hard to do as the paper are thick but I somehow managed to get the paper off how I wanted them to!

I watered down a bit of gesso with some water and with a brush I applied it to the background -- what I wanted to do here was toning down the brown paper. As much as I love that paper, I had to tone it down in order to make the beautiful girls shine. To stamp the image I used archival ink...and I know I say this everytime, but I see stories in these girls, everytime I use one stamp from Jamie, I imagine different stories -- maybe my feelings gets into the story too, but, it always leave hope in my heart...

I then started adding colors, I used watercolors to do so. I am not a master when it comes to coloring, but I try it anyway! When the color was dry, I used one of my favorite stencil (Spark) to add 3D Gel.
I let it dry and become completely transparent.
I let it dry and become completely transparent.
(NOTE: I got carried away into coloring the image above that I forgot to take a photo of the next step...so here you see a photo of the other ATC)

When the 3D Gel was dry and completely transparent I started adding colors. I used again watecolors -- lots of them!

I added some pieces of cheesecloth, a flower and the stickers with the quote!
Here's the first ATC....
Here's the first ATC....

I am totally in love with this stencil, love that it creates dimension without being "too much" busy.

Here's the whole photo of the first ATC...

...and here's the second one! I used pinkish tone....

This stamp is one of the new CHA2015 release from Jamie, isn't she absolutely beautiful? Make sure to check out the whole stamp, it will blow your mind!

Here's a photo of the whole second ATC...

And here's the two ATCs together!

So, does your ART lift your heart too? I hope it does...and I also hope you will like the result, as always for any comments, questions, suggestions please leave a comment!
Stay happy, stay creative....till next time!
CIAO Zoey